
These spectacular paleo creme eggs are pure clean eating fun! These little treats are vegan, raw, gluten-free, grain-free, and free from unrefined sugars! Oh and did we forget to mention that with a little substitution, it’s easy to make them nut-free too for any allergy sufferers out there.
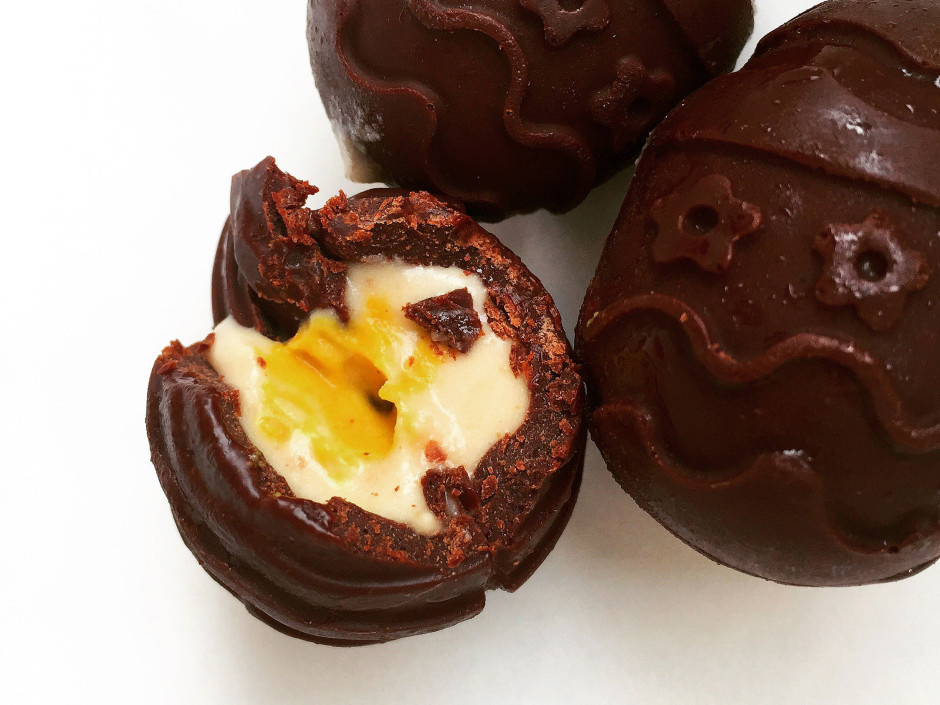
Paleo Creme Eggs
By Georgina Young (www.greensofthestoneage.com)
Serves 15 | Prep 3 hours | Cook 15 mins |
GF DF EF V MF
- 150g cacao solids (a.k.a. cacao liquor/paste)
- 150g cacao butter
- 4.5 tbsp/67.5ml raw honey/maple syrup
- ¼ tsp vanilla powder (optional)
- 25g cacao butter
- 80ml coconut cream
- 2 tbsp/30ml maple syrup
- 1 tbsp/15ml coconut oil
- 1 tbsp/15ml cashew butter (or coconut manna/oil)
- 1 tbsp/15ml vanilla extract
- 4 tbsp/60ml of the white creme filling
- ½ tsp maca powder
- ½ tsp ground turmeric
- OK, let’s start with the nitty gritty – the shells. In a large mixing bowl (in fact one wider than your moulds) add your cacao solids and butter, raw honey and vanilla powder. Place the bowl over a pan of water on a low heat, creating a bain-marie. Stir the contents frequently using a spatula, making sure to scrape down the sides ensuring that everything melts evenly. Once melted remove the bowl from the heat and allow to cool for a few minutes before pouring into your silicone jug. Set aside your mixing bowl as you will need this later.
- Very carefully pour the chocolate from your jug into each indentation of your mould(s). Honestly do pour this as slowly and as carefully as you can until the chocolate fills the indentations fully but does not overflow. If it does overflow do not worry, simply scrape away using a spatula otherwise your shells will be incredibly hard to remove, so don’t be lazy and not scrape the excess otherwise you will find yourself having to re-make a whole batch. Before transporting your mould(s) over to the freezer open the freezer door! That’s tip number 1! To transport your mould hold each side firmly and gently pull them away from yourself to create enough tension to keep everything in the mould steady and level.
- Pop the mould(s) into the freezer for about 5-10 minutes or until you see that they have an outer ring of chocolate that has set at about a thickness of 5mm. Remove the moulds carefully using the technique I stated before and then turn the mould upside down over your large mixing bowl that you had set aside earlier. Pour until as much excess has come out and take a look at what your shells look like. I had a little problem with the top edges of the shells becoming too thin so you may want to set the mould back into the freezer for 30 seconds before removing and swirling the chocolate around the mould much like you would with one of those little mazes with the balls bearings in that you get in crummy Christmas crackers. If you find that the chocolate will not move carefully scrape around using a teaspoon until you have cleared out a suitable sized cavity. Place into the freezer for up to 2 hours before filling. You may remove the shells before hand if you wish but you will have to work quickly as raw chocolate melts fast. If you are doing this now look at my tips for removing the shells in step 6.
- Now prepare the mixture for your creme white filling. Add all of the ingredients for your white creme filling into a small heat proof bowl over a bain-marie on a low heat until fully melted. You will want to stir the ingredients occasionally. Remove from the heat and transfer 4 tablespoons of the mixture into a small cup. Stir in the maca powder and turmeric into your 4 tablespoons of mix and stir until evenly distributed. Place both mixes into the freezer and freezer for one hour to an hour and a half until very thick. Make sure that you stir your mixes every 15 minutes so that it freezes evenly.
- Now it’s time to fill your eggs! Remove the egg moulds from the freezer and press in a small amount of white creme filling into each half shell followed by a little ball of the yolk creme filling. You can roll these mixes in your hands but work fast otherwise it will melt into a liquid quickly. Once filled return to the freezer for another 10 minutes to set again.
- Remove your moulds from the freezer and carefully pull away the outer edges of the indentations around the chocolates before carefully pushing the bottom of the shell upwards. Once all halves have been removed place back into the freezer again for 5 minutes so that you don’t melt the mix.
- Remove the eggs from the freezer and using a heated butter knife (I just placed mine over the stove for a few seconds) melt the inner rings of the egg shells before firmly yet gently pressing the two halves together. Place each egg in the freezer individually before starting the next. Repeat until each egg has been sealed! If you find that the eggs aren’t sealing well you could pipe a little melted chocolate into the gaps or even gently brush some on with the edge of a knife! And that is it, quite a few hours of hard work for some super yummy eggs! Store them in the fridge so that the chocolate doesn’t melt but leave out at room temperature for 15 minutes before eating them!
- Prep time includes a 2 hour setting time and makes 15 small eggs.
- This recipes requires an egg mould and silicone chocolate pouring jug.
- If you can’t get hold of a mould, you really don’t want to faff around with moulds, or you simply do not have time to make the shells then you can use my simple method:
- Roll the frozen yolk mix into a small ball, return to the freezer, shape the frozen white mixture around it into an egg shape, return to the freezer again.
- Dip the egg into the melted chocolate mix and return to the freezer upright. Repeat the chocolate dip process upto 3 times to get a nice thick shell. I would also recommend using some cocktail stick to stab into the bottom of the egg and then find something to lodge them into to keep upright like a sturdy piece of foam or a cardboard box.
- If you can’t obtain cacao solids (cacao liquor/paste) for your milk chocolate sub for 75g cacao powder and increase the cacao butter from 150g to 225g to obtain a similar result. Cacao solids retain about 50% of cacao butter after the cacao beans have been crushed into a liquid state and then solidified at room temperature. This is not the same thing as cacao powder!
 About the author: Georgie is a fresh faced, freelance writer and recipe developer who specialises in nutrition, fitness, and health and well-being. She enjoys sharing her passion for cooking, Paleofying food, and exploring Veganism within the Paleo diet on her blog, Greens of the Stone Age, and along the way has helped many friends to take a more holistic approach to their hectic lifestyles. She have further expanded upon her love of the Paleo way of living by setting up Primal Eye Magazine – the UK’s 1st online Paleo lifestyle magazine!